As we are heading firmly into the winter in the UK, the campsites are closing and the roads are starting to be covered in grit. Both of these are bad news for us campervan owners, as it generally signals the end of the season…if you can call it that this year! For my latest ‘How To’ guide, I am going to take you through a few steps that you can do to prepare your van for a winter off the road, to ensure that you don’t have any issues once we come back out of hibernation in the spring.
Personally, as I also use my van for transporting mountain bikes, collecting Christmas trees and various other activities, I don’t fully take my van off the road over winter. I know many people who just use them as full campers and won’t use them at all over winter, and my first piece of advice if you’re in that camp is to SORN your van as soon as you stop driving it! You will save yourself a tonne of money – as an example my van tax is £25 a month, so if you’re off the road for 5 months you can save yourself £125. It’s super quick and easy to do online, and it’s definitely worth doing…just make sure you remember to tax it again in the spring!!
The website for registering your vehicle as off the road is here – https://www.gov.uk/make-a-sorn
The next tips I’m going to take you through apply both to fully off the road or part-time usage van owners…some might not apply to you but I think they’re all useful things to think about doing. Hopefully these tips will help you prepare your van for winter hibernation, and reduce the likelihood you’re going to have any dramas in the spring.
Ideal Storage Situation
I am fortunate enough that I have a big drive that I can fit my van on, but as our garage is full of motorbikes it doesn’t have the option to be stored in there! In an ideal world, over winter your van should be kept inside if possible…whether that’s in a garage or in a barn. You’d be surprised at the reasonable cost that you can find storage solutions for, which also helps to save space on your drive/parking area while you aren’t regularly using your van. I have a few friends who store their motorbikes in older people’s garages who don’t use them, and pay a few pounds a month for the privilege. If you could find something like this for your van then that would be ideal!
If you do have indoor storage it means your van’s exposure to the winter elements is greatly reduced, which can really make your life a lot easier and significantly increase the lifetime of your van! However, I am fully aware this isn’t practical for everyone (myself included!) so I hope these tips can help you prepare your van as thoroughly as possible for the winter season. If you do have the option for indoor storage, don’t think you can skip to the end – these tips still apply to you too!
Tip #1 – Underseal your Van
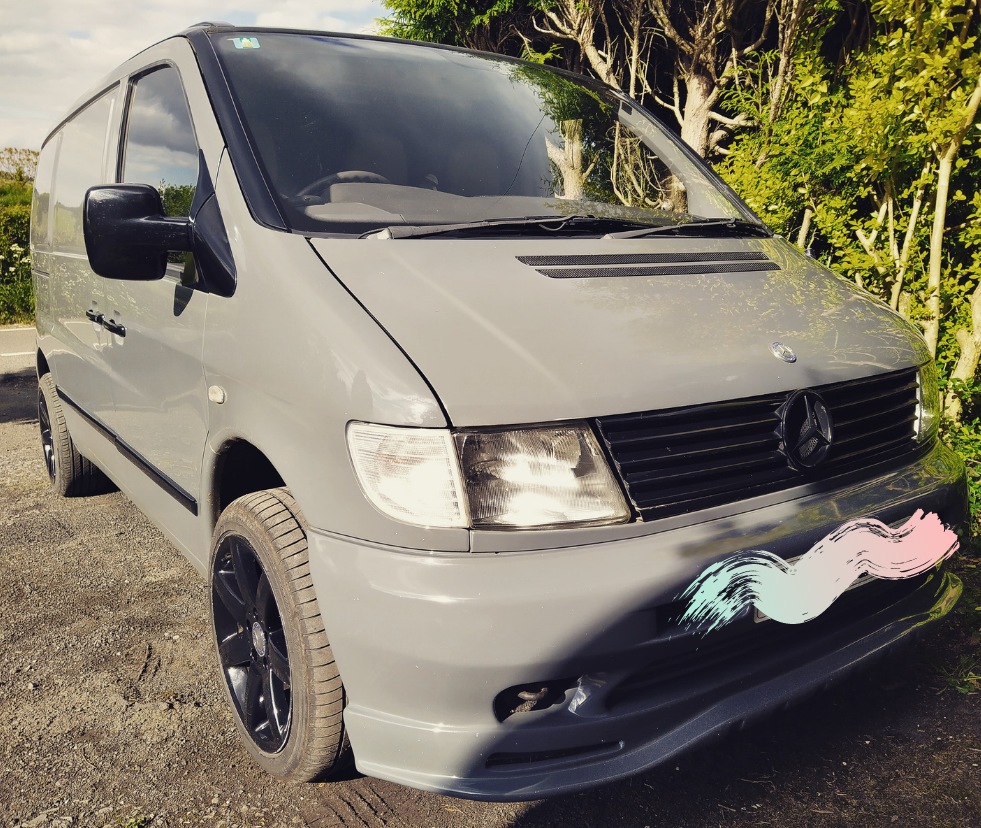
I own a 2003 Mercedes Vito, which is a van with a brilliant engine but they forgot to think about the bodywork durability when they designed it… I have been plagued with rust issues like so many van owners, and I’ve had years of pain getting it through MOTs. A lot of older vehicles don’t have any protection against rust on the underside of the bodywork, which is where they are most exposed to damage from salt on the roads. This can cause many issues, which are often undetected until you receive your fail certificate from your MOT tester which has a list a mile long…
However, there are a few things that you can do to try and prevent these issues as much as possible. The best way to protect your van is to get it undersealed, which is basically a spray-on flexible protective coating that helps to prevent corrosion. This can be done at home, but it is a super messy job and you have to have ramps/jacks that mean you can access the underside of your van. I would recommend having this done professionally, as you know that it’s done properly, has the correct cure time and any other issues can be identified at the same time.
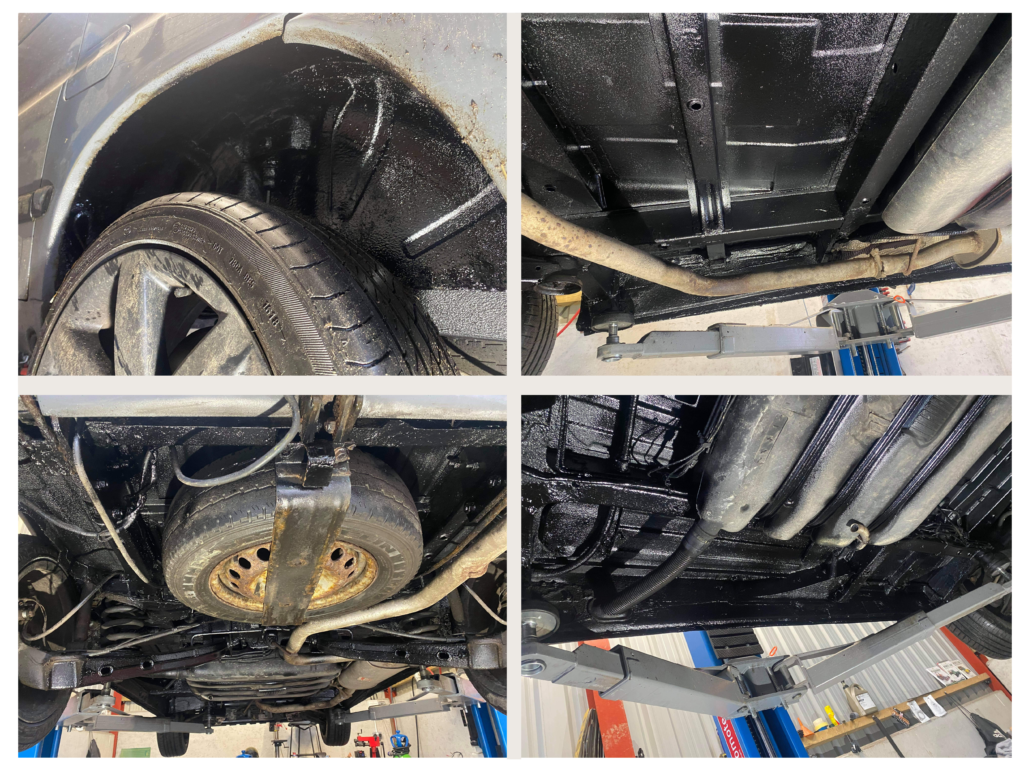
My partner and I do the vast majority of maintenance on my van, but this is one job we leave to the professionals. After my van passed it’s MOT this month with flying colours, and with the knowledge that the underside of the van was in good condition it made sense to do it before this winter really hits. I took it to Carl of D7R Fabrication (based in Benthall, Shropshire), who did a load of welding for me last year to get it through its MOT. I can’t recommend his services enough, if you need any kind of welding or fabrication doing then he is the guy to go to. He undersealed my van for me this year using 3M Spray Schutz, which provides a rubberised protective coating on the wheel arches and underbody of my van. You can see in the photos above what this process does, and I am heading into the winter feeling confident that my van is protected as well as it can be.
You can visit Carl’s website for more information on his services, and you can get in touch with him with any enquiries or bookings: https://www.facebook.com/D7R-Fabrication-179838456059825
I would also recommend this treatment on older cars as well as vans; just have a look at your last MOT and if you had any advisories on corrosion on the underside of your vehicle it’s probably a sensible investment to make. Hopefully it will prevent having major issues with rust in the future.
Tip #2 – Remove all Bedding
Now this might be an obvious thing to say, but I have to admit I have had a winter in the past where I couldn’t be bothered to sort out my bedding and so just left it in the van. Roll on springtime, and when I went to sort my van out ready for my first camping trip I was faced with mouldy pillows! I annoyed myself when this happened because it was just down to being lazy and not knowing where to store my bedding inside over winter.
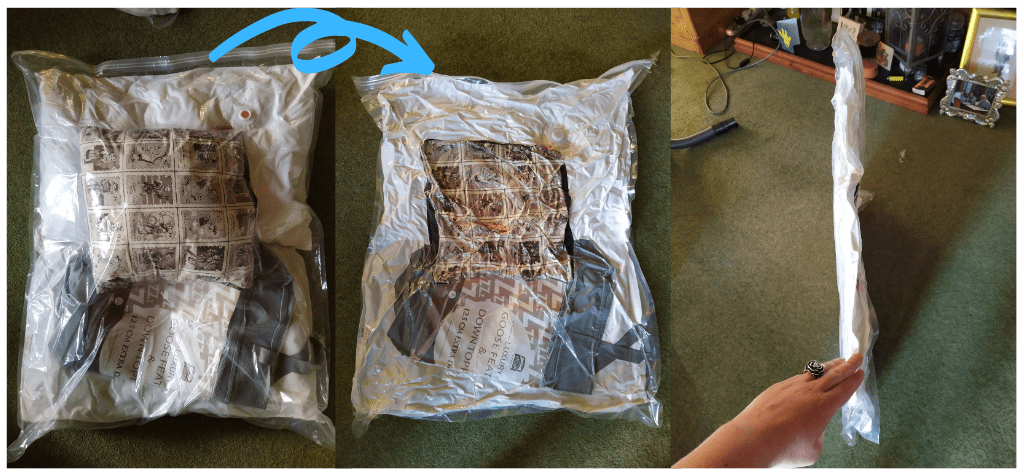
That’s where I came across the incredible innovation that is vacuum sealing bags! Some of you may already use these for other things, but honestly I had no idea how useful they are. I bought the following set off Amazon, which I have now used over the last three winters and have had no issues with.
Viridescent® Vacuum Storage Bags: 100 MICRON 5 packI bring all of my bedding in (including a mattress topper), wash all of the covers and then get the vacuum bags out. It’s the simplest process – you just fill up the bag with your bedding, seal it up and then use a vacuum cleaner to suck all of the air out of the bag, until it’s sufficiently shrunken down. Then pick a nice dry place to store them – I usually put them in the loft to keep them out of the way.
Tip #3 – Dehumidifier to Prevent Damp
A few years ago I happened upon these Pingi Dehumidifiers, as my van doors like to hold quite a lot of water (another great Mercedes design!), the windscreen often steams up and it could smell a bit damp if it was sat for periods of time. This little bag is super easy to use, you simply put it on your dashboard (or anywhere inside your van) and it absorbs any moisture and condensation. It’s got a colour indicator on the top which turns from blue to pink when it’s ‘full’ and needs drying out…which in itself is done just by microwaving it for a few minutes. This is great because it means you can keep reusing it over and over, which also makes it a nice environmentally friendly purchase.
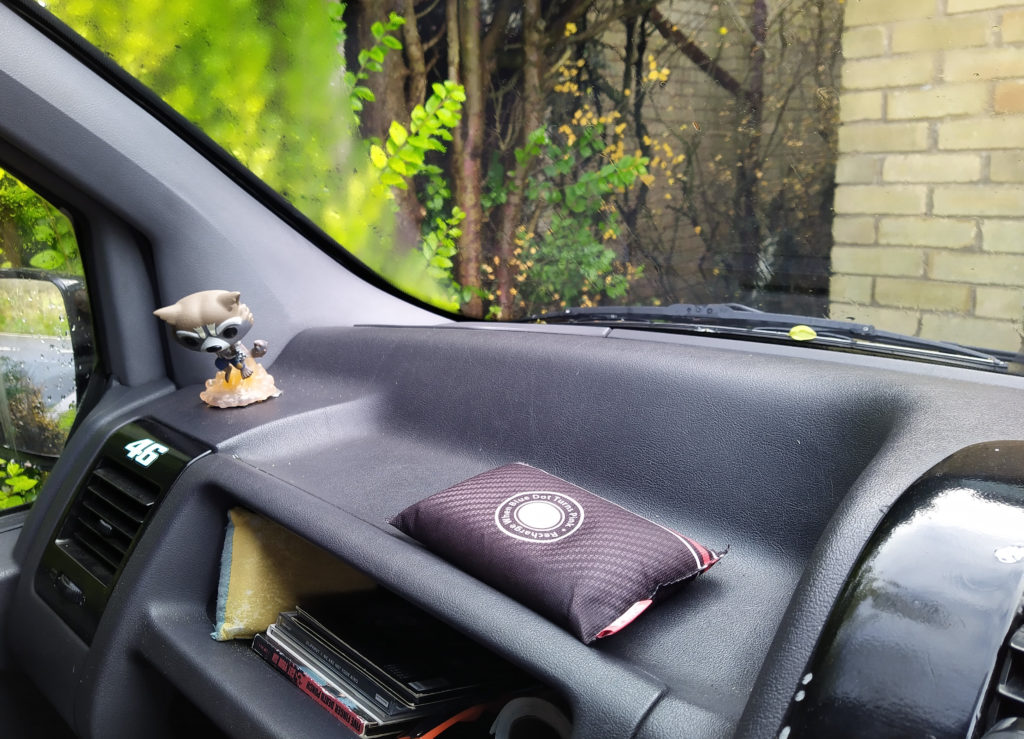
I’ve definitely noticed a reduction in moisture and general damp smells in my van since I’ve been using this, and my partner has found the same with the one he keeps in his project car. It’s a small purchase that I think can really help when you’re not going to be driving your van as much and getting it all up to a nice temperature. The link to the ones that we use is below:
Pingi Dehumidifier – Reusable 2 x 350 g BagsTip #4 – Keeping your Battery Topped Up
Batteries are probably one of the most important but also frustrating components of your van! If you leave your van with the battery connected up and don’t start it for months, then you are more than likely going to come back to a van with a flat battery. This obviously isn’t ideal as batteries are expensive and you don’t want to be replacing them every year. I wouldn’t necessarily recommend disconnecting your battery, as it can often cause issues with alarms and radios when you reconnect it again.
Ideally I would recommend you to use a trickle charger to keep your battery topped up to a healthy level, which is fully automatic once you’ve got it connected up to your battery. However, I know that it isn’t necessarily the most practical option as you might not have anywhere to plug a charger in, your battery might be in a stupidly awkward place or you might not want to fork out for one as they are quite expensive.
My more practical recommendation is to get in your van every couple of weeks and just run it up for 10 minutes or so. This is what I try to do if I haven’t used mine for a few weeks, as it just keeps the battery condition topped up. If you haven’t taken your van off the road for winter then it’s worth taking it for a spin every month or so, just to give it a bit of a run instead of being sat stationary for months.
Tip #5 – Maintain Tyre Pressures
Tyre pressures are something that are easily forgotten when a van is parked up for winter as you aren’t using it! However, this can be even worse for them, as if they are sat for a long time without moving then you will get flat spots on your tyres. This then means you will get vibrations and poor handling, and if it is too bad and driven on for too long it can cause punctures. With tyres being expensive and punctures being less than ideal, I would definitely recommend making sure you keep an eye on your tyre pressures while you aren’t using your van.
I would advise to check them every couple of weeks, but once per month would be the absolute longest I would leave checking them. This will help to keep your van in roadworthy condition, and reduce the amount of things you may have to replace in the spring if you just leave it parked up.
Tip #6 – Park in Gear with Handbrake Off
Finally, if it’s going to be a long time that you aren’t using your van for then it is best to leave it with the handbrake off and in gear. This means that you won’t have the potential issue of your pads getting stuck to your discs, or your brake shoes getting seized onto the hub. I don’t do this myself as I use my van enough to not need to (plus I have a super steep drive which makes me nervous at the best of times!!), but this definitely makes sense if it is going to be parked up for a long time.
I really hope these tips help you prepare your van for winter…hopefully as soon as we know it we’ll be dusting them back off and getting ready for more adventures in the spring. I would love to hear any feedback or comments, or any other tips that you think I have missed that could help me out too! You can always contact me via email at thefemaleengineerblog@gmail.com or in the comments section of this post.
Emilie
The Female Engineer
*Disclaimer – as an Amazon Associate I earn from qualifying purchases.